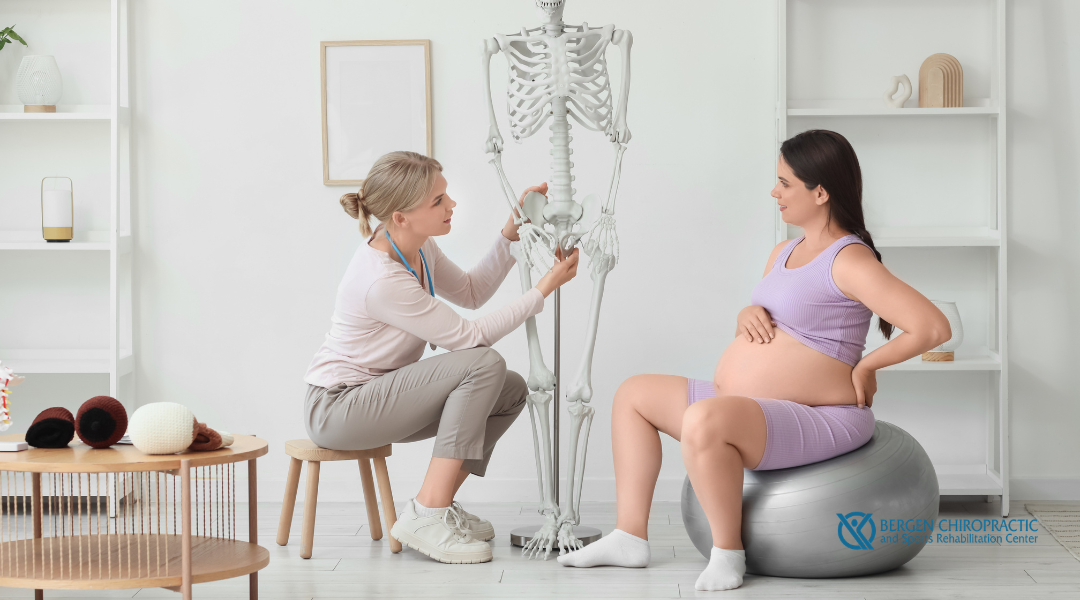
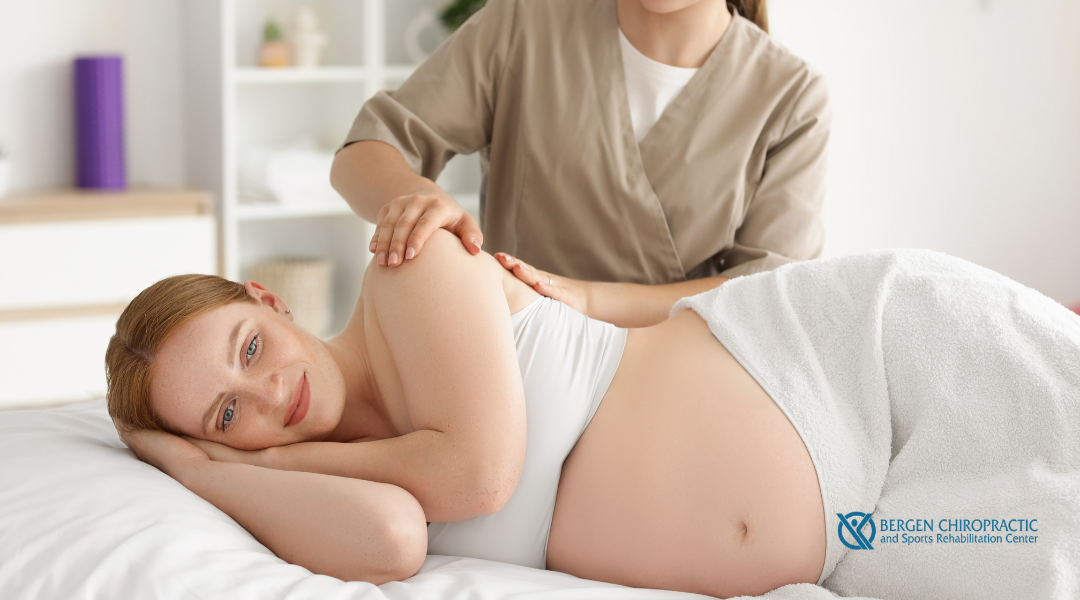
Unlocking Wellness: The Role of a Chiropractic Neurologist

Unlocking Wellness: The Role of a Chiropractic Neurologist

Imagine a healthcare approach that’s all about fine-tuning your body’s inner workings — like a mechanic for your nervous system. 

A treatment philosophy about non-invasive, drug-free strategies that are personalized for your unique needs. 

Hang on tight as we discover the wonders of chiropractic functional neurology!


What is a Chiropractic Neurologist?

We’ve all heard of chiropractors, right? They’re those amazing professionals who have magic in their hands, helping to ease our aches and pains with some strategic pushing and pulling.

Now, imagine coupling that chiropractic wizardry with some deep knowledge of the human brain and nervous system — that’s what a chiropractic neurologist is all about!

A chiropractic neurologist is basically a super-specialized chiropractor. They do all that cracking and spine aligning that regular chiropractors do, while also having a deep understanding of the nervous system and brain function. They’re the perfect blend of chiropractic and neurology, equipped to handle a variety of conditions not typically associated with chiropractic care. They’ve got the skills to deal with chronic pain, vertigo, learning, movement disorders, and so much more!


What is the Approach of Chiropractic Functional Neurology?

Chiropractic neurology is all about the power of the nervous system. 

Our nervous system is the body’s control center, handling everything from our motor skills to our sensory experience. 

By using specific chiropractic techniques, these brainy experts can bring about changes in the nervous system. It’s almost like they can ‘rewire’ the brain and nervous system through their treatments!


The Differences Between a Chiropractic Neurologist and a Medical Neurologist

differences between a chiropractic neurologist and a medical neurologist

While practitioners of both professions share a common interest in the nervous system, the way they approach and manage neurological conditions is quite different:


Background & Education

A chiropractic neurologist starts off as a chiropractor, and then takes additional training in neurology. They follow a holistic, or whole-body, approach to health, all about non-invasive treatments, like spinal adjustments.

A medical neurologist, on the other hand, goes through medical school, a neurology residency, and a sub-specialization. They are trained to use medications and surgeries to treat neurological conditions.


Treatment Approach

A chiropractic neurologist focuses on functional aspects of neurological disorders. They use physical manipulations to improve neural pathways, enhance brain performance, and, essentially, trigger the body’s healing response.

Medical neurologists use a more conventional approach. They can prescribe medications, recommend physical therapy, and even perform surgeries if needed.


Targeted Medical Conditions

Chiropractic neurologists often treat patients with movement disorders, chronic pain, or recovery needs from injuries. They also help patients who have difficulties with balance or coordination, or who suffer from conditions such as ADHD or dyslexia.

Medical neurologists treat a wide range of conditions that affect the nervous system, such as Alzheimer’s disease, epilepsy, multiple sclerosis, Parkinson’s, and stroke. They also deal with issues that affect the brain, such as migraines or neuropathic pain.


Use of Medication

A chiropractic neurologist doesn’t typically prescribe medication. Instead, they use chiropractic adjustments, exercises, or even diet changes to help treat conditions.

A medical neurologist, however, often does prescribe medication as part of a treatment plan. They might also recommend more traditional routes, such as surgery, depending on the condition.


The Arduous Road to Becoming a Chiropractic Neurologist

First things first, you’ve got to become a chiropractor.

This starts with a solid pre-medical undergraduate education. A solid grasp of biology, anatomy, and other sciences is crucial. Now, don’t go thinking this training is all bookwork — you must also have good hands-on skills because of all the popping and cracking that chiropractors do.

After your bachelor’s, you’ll head to chiropractic school. This is where you’ll really dive deep into the world of spinal manipulation and patient care. These programs usually last about four years and give you a Doctor of Chiropractic degree at the end.

Next, you’ll enroll in a three-year post-doctoral program that specializes in neurology. It might be intense and rigorous, but it’s where you get to learn all about the amazing world of the nervous system!

This continuing education will teach you how to diagnose and treat conditions that involve the nervous system. But it’s not all about the brain — you’ll also learn how it connects with every part of the body! This way, you can figure out how a problem in one part of the nervous system may affect other parts of the body. It’s like becoming a detective but for the body!


Chiropractic Neurologists are Certified by the American Chiropractic Neurology Board

At the end of all that learning, there’s one final hurdle: the board exam, organized by the American Chiropractic Neurology Board (ACNB). It’s not a piece of cake, but if you’ve made it this far, you’re more than ready for it. Once you’ve aced that exam, you can officially call yourself a chiropractic neurologist!


7 Conditions Treated Through Chiropractic Neurology

conditions treated through chiropractic neurology

Chiropractic neurology addresses a pretty wide range of conditions by focusing on how disorders in the nervous system can impact the rest of the body and vice versa, such as:

  • Movement Disorders: Whether it’s an issue like tremors or something more complex like Parkinson’s, these specialists use hands-on techniques to improve movement and coordination.
  • Neurodevelopmental Conditions: This includes conditions like ADHD, Autism, and dyslexia, where a little tweak in the nervous system might lead to improved function and less distress.
  • Balance Problems: Feel like you’re always about to tip over? These specialists work to enhance the neural connections that help keep you steady.
  • Chronic Pain: Chiropractic neurologists are known to help manage this pesky condition, especially if it’s related to nerve dysfunction.
  • Concussions and Traumatic Brain Injuries: A chiropractic neurologist has the techniques to stimulate healing and manage the symptoms of post-concussion syndrome or the lingering effects from a brain injury.
  • Learning and Behavioral Difficulties: The brain is like the CPU of the body, and sometimes, a glitch can lead to learning and behavior issues.
  • Vertigo and Dizziness: If you’ve been feeling like you’re on a non-stop merry-go-round, these specialists might be able to help by addressing the underlying neural misfires.


What are the Advantages of Chiropractic Functional Neurology?

advantages of chiropractic functional neurology

  • Non-Invasive: No scalpels or stitches here! Chiropractic neurologists use hands-on techniques and exercise-based treatments, meaning there’s typically no need for surgery or invasive procedures.
  • Drug-Free: They focus on improving your body’s function through natural methods. So, you’re looking at fewer prescriptions and a lower risk of side effects!
  • Personalized Care: No one-size-fits-all approaches in this field. Chiropractic neurologists create tailored treatment plans based on your body’s specific needs.
  • Whole-Person Approach: A chiropractic neurologist doesn’t just focus on one part of the body. Instead, they look at how all of your systems interact, leading to more effective treatment.
  • Improved Quality of Life: By addressing the root causes of symptoms, not just the symptoms themselves, patients often experience better overall health, increased performance, and improved quality of life.
  • Comprehensive Treatment: Chiropractic neurologists can often help with a wide range of conditions — from movement disorders to chronic pain — offering versatile treatment options.


Learn More About Chiropractic Care With Dr. Doerr and His Expert Team!

At Bergen Chiropractic and Sports Rehabilitation Center, our chiropractic team, under the leadership of Dr. Gregory Doerr, adheres to the highest and most professional medical standards to provide superior chiropractic help. Our mission is to provide unparalleled patient care in a comfortable, healing atmosphere. 

Access our contact form or call us at (201) 945-4075 to learn more about our chiropractic care services! Our offices at 532 Anderson Avenue, Cliffside Park, NJ 07010, and 62 Summit Ave, Hackensack, NJ 07601, are ready to welcome you as we proudly serve the areas of New York, New Jersey, Philadelphia, PA, and Baltimore, MD. Also, feel free to access our blog, Facebook, and Instagram pages for more information on chiropractic adjustments!


References

  1. “Chiropractic Neurologists Are Experts in the Brain, Spine, and Nervous System Who Have Received Extensive Training and Certification.” ACNB, acnb.org/. Accessed 28 July 2023.
  2. Margach, Russell W. “Chiropractic Functional Neurology: An Introduction.” Integrative Medicine (Encinitas, Calif.), Apr. 2017, www.ncbi.nlm.nih.gov/pmc/articles/PMC6413643/. Accessed 28 July 2023.
Game Changers: Treating the 15 Most Common Sports Injuries

Game Changers: Treating the 15 Most Common Sports Injuries

Ever been sidelined with an annoying injury when you’re just starting to hit your stride? 

Yep, it’s the worst. 

But, worry not, because when sports injuries strike, experts like Dr. Doerr from Bergen Chiropractic have got your back … and your knees, and your shoulders! With extensive knowledge of sports-related injuries and a comprehensive arsenal of treatment techniques, Dr. Doerr is just the person you need to get you off the bench and back in the game.

So, stick around as we dive deeper into some of the most common sports injuries, their causes, symptoms, and most importantly, how sports chiropractors come to the rescue!


Am I Susceptible to a Sports Injury?

Anybody is susceptible to a sports injury, whether you’re a pro athlete, a weekend warrior, or just someone trying out a new physical activity. Certain risk factors increase your predisposition to both minor and more serious injuries, including:

  • Activity Type: High-intensity sports like football, basketball, or rugby often come with a higher risk of injury. But even lower-impact activities like jogging or swimming can lead to acute injuries. 
  • Training and Preparation: Skipping warm-ups or cool-downs, not using proper gear, or not following good form or technique can all put you in the injury zone. 
  • Fitness Level: Your body will protest if you’re out of shape and jump into an intense activity. It’s important to build up your fitness level gradually. 
  • Age: Kids and teens are more prone to certain injuries because their bodies are still growing. Older adults may also have a higher risk due to decreased bone density and muscle flexibility. 
  • Previous Injuries: Repeated injuries and partial recovery make you more susceptible to recurring issues.


6 Causes of Sports Injuries

causes of sports injuries

Sports injuries are a common occurrence, whether you’re casually shooting hoops in the backyard or you’re running a marathon. While accidents can happen anytime, certain factors increase the likelihood of sports injuries:

  • Poor Training Practices: If you don’t warm up/cool down properly, if your form is off, or if you’re not using the right equipment, you’re setting yourself up for potential injuries. 
  • Overdoing It: Going too hard, too fast, or too long can lead to overuse injuries. Your body needs time to recover and adapt to new levels of physical stress. 
  • Being Out of Shape: Couch potatoes are never ready for intense physical activity. Start off with baby steps, slowly allowing your body to prepare for the upcoming physical stress. 
  • Environment: Slippery or uneven surfaces, poor lighting, extreme weather conditions — they can all lead to injuries if you’re not careful. 
  • Not Using Proper Gear: Whether it’s the right footwear, protective padding, or equipment suited to your size and ability level, appropriate gear is essential to preventing injuries. 
  • Ignoring Fatigue or Pain: Not heeding your body’s signals is a risky move. If you’re feeling worn out or you’re in pain, it’s best to take a break. Playing through pain will only worsen an injury.


8 Common Symptoms of Sports Injuries

8 common symptoms of sports injuries

Getting sidelined is every athlete’s worst nightmare. That’s why you must learn to recognize the signs of an impending injury.

Here are some of the most common symptoms of sports injuries:

  • Pain: Sharp, persistent pain — anything different from the typical “feeling the burn” sensation — is a sign that something might be off. 
  • Swelling: It’s normal to experience swelling right after an injury, but if it doesn’t recede after a few days or gets worse, it’s time to see a physician. 
  • Limited Mobility: The inability to move a joint as far as usual might be a sign of an injury. 
  • Weakness: Feeling unusually weak or unstable in a specific area, like your knee giving out when you’re running, can be a sign of an injury. 
  • Visible Deformities: If something looks out of place (like a bone or joint), immediately seek out medical attention. 
  • Numbness or Tingling: These can be signs of nerve damage. 
  • Changes in Skin Color: If the skin around an area is red, blue, or looks different than usual, you might have an injury. 
  • Tenderness: If an area is particularly sensitive to touch or pressure, it could be injured.


15 Most Common Sports Injuries

Achilles Tendinitis

achilles tendinitis

Achilles tendinitis occurs when your Achilles tendon — the tough band of tissue connecting your calf muscle to your heel bone — gets irritated from too much running, jumping, or even walking. It’s like a nagging pain or stiffness in the back of your leg or just above your heel.

Runners experience Achilles tendinitis most often, especially if they exert themselves too hard or too quickly. Also, weekend athletes who suddenly want to relive their high school glory days can get hit with it.

The key is to gradually increase your activity level, warm up before you start, and listen to your body when it’s telling you it’s time to chill!


Ankle Sprain

An ankle sprain is like the classic misstep of the sports world. It’s when you roll, twist or awkwardly land on your ankle causing the ligaments (those elastic bands of tissue that hold your ankle bones together) to stretch or tear.

You know you’re dealing with an ankle sprain when you get that sudden sharp pain, swelling, bruising, or even trouble walking.

Athletes are prone to it, especially if they play sports that involve jumping, running, or any quick change in direction. The good news is, most of the time, with a bit of rest, ice, compression, and elevation (for example, the RICE treatment), you’ll be back on your feet in no time.


Anterior Cruciate Ligament Injury

anterior cruciate ligament injury

The Anterior Cruciate Ligament (ACL) is the superstar of sports injuries.

The ACL is one of the four main ligaments in your knee, playing a big role in keeping your knee stable. So, hearing about an ACL injury is about as fun as stepping on a Lego barefoot.

It often occurs when you’re making a sudden change in direction or landing a jump — think basketball or soccer. It feels like your knee just can’t hold you up anymore.

These injuries range from mild (a small tear) to severe (the ligament is torn completely or detached from the bone).


Broken Bones

A bone fracture is basically when the load on a bone is way heavier than what it can handle. It’s like if you pile too many books on a thin shelf, eventually, it will crack or break.

Bone fractures manifest themselves either as stress fractures (tiny cracks in the bone from overuse, like running marathons or dancing ballet on repeat) or as traumatic fractures (think about crashing on your bike or getting tackled hard during football practice).

Either way, it’s a bummer because it means rest and healing time, but it’s also your body’s sign that it needs a break!


Concussions

A concussion is essentially your brain getting shaken up inside your skull, often due to a hard hit or sudden jolt.

Think of your brain as a soft organ floating in fluid inside your hard skull. A blow to the head or even a swift whiplash-like movement can cause the brain to smack into the skull, resulting in a concussion.

Symptoms can range from headaches, dizziness, and confusion, to even loss of consciousness.

But here’s the kicker — symptoms might not show up immediately. So if you or a teammate takes a hard knock, it’s super important to immediately get checked out by a physician ASAP, even if you feel fine at first. After all, we’re talking about the brain here! Safety first, and playing sports comes second.


Golfer’s Elbow

golfer's elbow

A golfer’s elbow occurs when the tendons on the inside of your elbow get irritated or damaged, usually from overuse. Imagine the strain on your forearm when you’re doing a golf swing, throwing a baseball, or even just lifting weights — that’s the spot.

Despite its name, you don’t have to be a golfer to get it. It can be a real pain, literally, causing discomfort on the inner side of your elbow and sometimes even down your forearm. You might also notice weakness in your hand and wrist.

If you’ve got it, rest and ice are your best friends. Don’t forget to stretch and strengthen those muscles to prevent it from happening again!


Groin Pull

Groin pull is a sports injury you definitely want to dodge. Imagine the muscles of your inner thigh having a major disagreement with a sudden move you make, like a quick side-step, twist, or intense sprint. That’s what we call a groin pull or a groin strain.

This type of injury happens when those inner thigh muscles get stretched beyond their comfort zone. It may range from mild discomfort or an acute injury. If you feel a sudden sharp pain, weakness, or even a popping feeling in the groin area during your workout or game, you may have pulled your groin.

Rest and ice the area right after the injury, and if the pain sticks around, see a healthcare professional to get it sorted.


Hamstring Strain

Hamstring strains occur when you overstretch or tear the muscles along the back of your thigh. It’s a common sports injury, especially in activities that involve sprinting or jumping.

Ever seen a soccer or basketball player suddenly pull up and grab the back of their leg? Probably a hamstring strain.

You will typically feel a sudden sharp pain, and might even hear or feel a “pop”. It can put you on the bench for a bit, but with some rest, ice, and physical therapy, most people can get back in the game before too long!


Knee Sprain

A knee sprain occurs when one or more of the ligaments in your knee gets overstretched or torn. In sports, this can happen with a hard hit, a bad landing, or a sudden twist.

You might experience pain, swelling, maybe even a popping sound at the time of the injury. Not to forget the instability — it might feel like your knee could give way when you put weight on it.

Don’t push through it, though! Rest up, put some ice on it, and see a physician if it doesn’t get better. They will recommend physical therapy or, in severe cases, surgery.


Patellofemoral Pain Syndrome

Patellofemoral pain syndrome, or runner’s knee, is a fancy name for pain in the front of your knee and around your kneecap. It’s pretty common in people who love to run, jump, or squat a lot.

This condition often occurs because your kneecap is not sliding smoothly in the groove at the end of your thigh bone. The knee pain worsens when going up or down stairs, kneeling, or sitting with your knee bent for a long time.

Fortunately, with rest, physiotherapy and a few tweaks to your workout, athletes can effectively manage this condition!


Rotator Cuff Injuries

Rotator cuff injuries occur when any of the four muscles and tendons that make up your rotator cuff are injured — the part of your shoulder that helps you lift and rotate your arm.

Athletes who do a lot of overhead action, like swimmers or baseball pitchers, are the ones who usually get hit with such injuries.

They can feel like a dull ache deep in your shoulder and might disturb your sleep, especially if you lie on the affected side. Even everyday things like combing your hair or putting on a shirt might even feel like you’re trying to win an Olympic gold medal.

It’s a real drag, but with some rest and the right treatment, it’s something you can bounce back from!


Shoulder Injuries

shoulder injuries

Shoulder injuries in athletes often happen due to a lot of repetitive, overhead motions. Think swimming, tennis, pitching in baseball — all of these can lead to shoulder issues. These injuries usually involve the muscles, ligaments, and tendons, rather than the bones.

Athletes are at risk for shoulder injuries like strains, sprains, dislocations, and conditions like rotator cuff injury or bursitis.

Symptoms include pain (especially when moving the shoulder), stiffness, swelling, and loss of mobility.


Sciatica

Sciatica is basically a pain party that your body throws, starting from your lower back and shooting down through your butt and legs. It’s caused by irritation or compression of your sciatic nerve, which runs all the way from your lower spine to your feet.

Athletes experience sciatica pain from heavy lifting, bending, or direct impact injuries. The pain can be quite sharp and even cause numbness or tingling.

Treatment often involves rest, physical therapy, and sometimes pain management. Most athletes feel better over time, but severe cases require more intensive care. Always good to get it checked out if you’re hurting!


Shin Splints

Shin splints, or medial tibial stress syndrome, occur when your shins throw a fit after you’ve been running or jumping a lot. It’s this nagging pain along the inner part of your shinbone (the big bone on the front of your lower leg).

Shin splints are common, especially among runners, dancers, or folks in military training. Usually, it’s a sign that you’ve been overdoing it and your muscles, tendons, and bone tissue are under too much stress.

Giving your legs some well-deserved rest, icing the area, and doing some specific exercises often help calm things down. If the pain keeps hanging around, it’s best to get it checked out by a healthcare professional.


Tennis Elbow

tennis elbow

Tennis elbow, or lateral epicondylitis, is a common injury among athletes. It’s basically a muscle strain injury usually caused by damage to the tendons that attach the forearm muscles to the elbow joint, leading to pain around the outside of the elbow.

Despite its name, it’s not just tennis players who get it. Anyone performing a lot of repetitive gripping activities, especially if they use the thumb and first two fingers, can develop tennis elbow.


How to Prevent Sports Injuries

Sports injuries can really put a damper on your fun, so it’s essential to take steps to avoid them.

Here’s what you can do to stay safe during games or practice:

  • Warm up before you start: Don’t go from 0 to 100 in a second! Your body needs a heads-up that you’re about to get active. A good warm-up includes light jogging, jumping jacks, or dynamic stretches. 
  • Don’t skimp on the cool down: Just like you need to gear up before you start, it’s equally important to wind down when you finish. 
  • Stretch, stretch, stretch: Flexibility is crucial in preventing injuries. Regularly stretching keeps your muscles loose and ready for action. 
  • Gear up: Always use the right equipment for your sport. Whether it’s a helmet, shin guards, or the right shoes, every bit of equipment plays a role in keeping you safe. 
  • Mix it up: Don’t overuse one set of muscles. Cross-training will keep all your muscles in shape and prevent overuse injuries. 
  • Know your limits: Listen to your body! If something hurts, take a break. 
  • Hydrate: Drinking plenty of water keeps your muscles hydrated and less prone to injury. 
  • Get a physical: Regular check-ups can spot potential red flags before they become serious. 
  • Learn the right technique: Especially for activities like lifting weights, proper form is critical to sports injury prevention.

prevent sports injuries

Learn More About Sports Injury Prevention With Dr. Doerr!

At Bergen Chiropractic and Sports Rehabilitation Center, our chiropractic team, under the leadership of Dr. Gregory Doerr, adheres to the highest and most professional medical standards to provide superior chiropractic help. Our mission is to provide unparalleled patient care in a comfortable, healing atmosphere. 

Access our contact form or call us at (201) 945-4075 to learn more about our chiropractic care services! Our offices at 532 Anderson Avenue, Cliffside Park, NJ 07010, and 62 Summit Ave, Hackensack, NJ 07601, are ready to welcome you as we proudly serve the areas of New York, New Jersey, Philadelphia, PA, and Baltimore, MD. Also, feel free to access our blog, Facebook, and Instagram pages for more information on chiropractic adjustments!


References

  1. “Rice Method for Injuries (Rest, Ice, Compression, Elevation).” WebMD, WebMD, www.webmd.com/first-aid/rice-method-injuries. Accessed 30 July 2023.
Align Your Life: Chiropractic Aid for Pelvic Tilt

Align Your Life: Chiropractic Aid for Pelvic Tilt

If you’re dealing with a funky pelvic tilt and feeling like you’re out of alignment, check in with a pelvic tilt chiropractor. These skilled professionals can help get your hips back in the groove.

How, exactly?

Let’s explore the world of chiropractic care for pelvic tilt, as well as other DIY physical therapy approaches to bring everything back in alignment!


What is a Pelvic Tilt?

You know that bony structure sitting at the base of your spine, the one you’re probably sitting on right now? That’s your pelvis.

The term “pelvic tilt” refers to the orientation or alignment of the pelvic region in relation to the thigh bones.

Imagine your pelvis is a bowl of soup. In a perfect world, that bowl is nice and level, right? But sometimes, the front of your “bowl” dips forward, backward, or to one side, causing the 3 types of pelvic tilt.


The 3 Types of Pelvic Tilts

pelvic tilt

Anterior Pelvic Tilt

When dealing with an anterior pelvic tilt, the front of your pelvis drops, and the back of it lifts up. It’s like spilling the soup out the front of your bowl. 

This misalignment can lead to a pronounced curve in your lower back (imagine a duck’s posture). Common signs of anterior pelvic tilt include tight hip flexors and a slightly bulging belly.


Posterior Pelvic Tilt

When dealing with a posterior pelvic tilt, the front of your pelvis rises, and the back drops. It’s like you’re trying not to spill your soup as you lean back in your chair.

Posterior pelvic tilts can result in a flattened lower back, as well as tight hamstrings and glutes.


Lateral Pelvic Tilt

Due to a lateral pelvic tilt, one hip is higher than the other, causing your pelvis to tilt sideways. Imagine tilting your soup bowl to one side.

This tilt can result in one leg appearing shorter than the other, throwing your whole body’s alignment off.


8 Most Common Causes of Pelvic Tilt

pelvic

Poor Posture

Slouching isn’t just bad for your back — it can throw your pelvis out of whack, too. Spending a long time sitting or standing with poor posture can lead to a muscle imbalance and, voila, a tilted pelvis.


Sedentary Lifestyle

If your favorite position is couch potato, then your body might not be getting the movement it needs to preserve muscle balance. Inactive muscles can get tight or weak, causing an anterior or posterior pelvic tilt.


Exercise Imbalance

On the flip side, too much of a good thing can also lead to problems. If you’re overworking certain muscles while neglecting others during your workouts, you could end up with a muscle imbalance leading to a tilted pelvis.


Pregnancy

Carrying around a growing baby for nine months can put a lot of pressure on the pelvis. The added weight and shift in the body’s center of gravity can lead to an anterior pelvic tilt.


Obesity

Carrying around extra weight, especially in the belly area, pulls the pelvis forward, leading to an anterior tilt.


Injury or Surgery

Any injury or surgery affecting your range of motion can change the alignment of your pelvis.


Leg Length Discrepancy

If one of your legs is longer than the other (and we’re talking more than a tiny difference), it can cause a lateral pelvic tilt.


Does Hip Replacement Cause Pelvic Misalignment?

Hip replacement surgery may indeed affect your pelvic alignment, at least temporarily.

During a hip replacement, the surgeon installs an artificial joint that may not exactly match the length or angle of your original hip. The new joint leads to a change in your body’s biomechanics, potentially leading to a tilted pelvis.

After a hip replacement, you’ll be taking it easy for a while, during which time certain muscles weaken from disuse, potentially causing a tilted pelvis. Furthermore, you might start favoring your non-operated leg while moving around, throwing your pelvis off-kilter.


7 Symptoms of a Tilted Pelvis

pelvic tilt1

  • Lower back pain: The most noticeable symptom of pelvic instability. Your lower back will feel tense or sore, especially after a long day of standing or sitting.

  • Hip or knee pain: Your hips or knees will start acting up, too, because a tilted pelvis puts extra strain on these areas.

  • A noticeable difference in leg length: When your pelvis tilts, it can make one leg seem shorter than the other.

  • Stiffness or restricted movement: You might find it hard, awkward, or uncomfortable to move around as freely as before.

  • Changes in your posture: Anything from a protruding belly (even if you’re otherwise slim) to an overly curved or flat lower back.

  • Difficulty with certain activities: Things like running, squatting, or climbing stairs might become more challenging.

  • Weak or tight muscles: Depending on the type of tilt, some of your muscles (for example, your hip flexors or lower back muscles) may feel unusually tight, while others (your abdominal muscles or glutes) may seem weak or hard to engage.


How Do Chiropractors Correct a Pelvic Tilt?

Chiropractors are experts at manipulating the body to improve alignment, reduce pain, and increase function — all issues related to pelvic tilts.

First, your chiropractor will start with a thorough evaluation. They’ll check your posture and gait to figure out your sort of pelvic tilt, as well as what’s causing it.

Next, they’ll use an array of techniques to help correct the tilt:

  • One of the main chiropractic techniques is spinal adjustments or manipulations. These are quick, controlled movements aimed at realigning your spine and pelvis.

  • Chiropractors also recommend treatments such as massage, heat or cold therapy, and electrical stimulation.

  • Your chiropractor will also teach you DIY exercises and stretches to strengthen weak muscles and stretch tight ones — the key for maintaining proper alignment.


3 Exercises to Correct Anterior Pelvic Tilt

Exercise is an awesome way to strengthen and stretch the muscles behind an anterior pelvic tilt:

1. Bridges: Lie flat on your back, bend your knees, and keep your feet flat on the floor. Then, lift your hips off the floor while keeping your back straight. Hold for a few seconds, then lower back down. Start with a few reps, and work your way up.

Postpartum exercise: Pelvic tilt with bridge


2. Planks: Everyone’s favorite! They’re tough, but excellent for core strength. Make sure you’re keeping your body straight like a plank of wood. No sagging or lifting your butt too high.

Core Exercise: Plank

3. Hip flexor stretches: Your hip flexors are often tight if you have an anterior pelvic tilt. To stretch them, kneel on one knee, and push your hips forward. You should feel a stretch in the front of your hip. Hold for 20-30 seconds, then switch sides.

Hip flexor stretch


2 Exercises to Address Posterior Pelvic Tilt

If you’ve got a posterior pelvic tilt, you need to strengthen your abs and stretch your hamstrings:

1. Leg raises: Lie flat on your back, then slowly lift one leg at a time. Keep your legs straight and your toes pointed.

How to Do Leg Raises

2. Hamstring stretches: You can do these stretches while standing or sitting. Just reach for your toes and keep your legs straight. You’ll feel a nice stretch in the back of your legs.

How to do a seated hamstring stretch


Dr. Doerr’s Chiropractic Adjustments Will Help Correct Your Pelvic Tilt!

At Bergen Chiropractic and Sports Rehabilitation Center, our chiropractic team, under the leadership of Dr. Gregory Doerr, adheres to the highest and most professional medical standards to provide superior chiropractic help. Our mission is to provide unparalleled patient care in a comfortable, healing atmosphere. 

Access our contact form or call us at (201) 945-4075 to learn more about our chiropractic care services! Our offices at 532 Anderson Avenue, Cliffside Park, NJ 07010, and 62 Summit Ave, Hackensack, NJ 07601, are ready to welcome you as we proudly serve the areas of New York, New Jersey, Philadelphia, PA, and Baltimore, MD. Also, feel free to access our blog, Facebook, and Instagram pages for more information on chiropractic adjustments!

The 4 Immediate Benefits of Chiropractic Care for Frozen Shoulder!

The 4 Immediate Benefits of Chiropractic Care for Frozen Shoulder!

Shoulder mobility is one of those things we all take for granted, until we can’t do it anymore because of something like a frozen shoulder.

Then, even the simplest tasks like reaching for a can of soup on a high shelf or zipping up a dress can seem like climbing Mount Everest!

But, here’s some joyful news: chiropractic care has been stepping up its game when it comes to frozen shoulders! Chiropractors are the superheroes ready to swoop in to save the day, restoring your shoulder’s range of motion and getting you back to doing the things you love – minus the shoulder stiffness and pain.

Let’s delve deeper into how chiropractic care can give you a helping hand (or shoulder!) in the fight against frozen shoulders.

If your shoulder decides to “freeze,” there’s always help available to “thaw” it out!


The Anatomy of Your Shoulders

anatomy of your shoulders

Our shoulders are one amazing piece of machinery — they’re the most flexible joint in our bodies, allowing us to make all those wild movements, like throwing a ball or waving at someone.

The shoulder is made up of three bones: the collarbone (clavicle), the shoulder blade (scapula), and the upper arm bone (humerus). The head of your upper arm bone fits into a rounded socket in your shoulder blade, called the glenoid.

A combination of muscles and tendons, which we call the rotator cuff, keeps your arm bone centered in your shoulder socket. These tissues also help you lift and rotate your arm.

On top of the shoulder sits the acromion. It can bump or rub against the rotator cuff and the fluid-filled sac (bursa) that allows your rotator cuff tendons to glide freely when you move your arm. Such instances cause symptoms such as irritation or injury.

A strong, flexible sheath of fibrous tissue known as the joint capsule surrounds the shoulder joint. In the case of a frozen shoulder, it’s this capsule that becomes thick and tight, causing all that discomfort and limited movement.


What is a “Frozen Shoulder”?

A frozen shoulder, also called adhesive capsulitis, is a condition that affects your shoulder joint. It often kicks in when the flexible tissue that surrounds your shoulder joint thickens and tightens, limiting your shoulder movements.

Imagine your shoulder acting like it’s in the middle of the coldest winter — it doesn’t want to move, feels stiff, and hurts. That’s what a frozen shoulder feels like.

A frozen shoulder can develop when you stop using the joint normally due to an injury, pain, or a chronic health condition (diabetes, stroke, etc.). Any shoulder problem can lead to a frozen shoulder if you don’t work on reaching full range of motion.

The unpleasant part about a frozen shoulder is that it can be slow to recover. Fortunately, plenty of treatment avenues, like physical therapy, chiropractic adjustments, medications, and surgery, are available to address this condition.


The 3 Phases of the Frozen Shoulder Syndrome

The frozen shoulder syndrome consists of three stages: freezing, frozen, and thawing.


The Freezing Stage

The freezing stage is the phase when your shoulder starts to ache and become stiff. It literally feels like your shoulder is freezing up! Unfortunately, this phase can last anywhere from 6 weeks to 9 months.


The Frozen Stage

During the frozen stage, your shoulder becomes stiffer and harder to use.

The good news is that in this stage, the pain might actually decrease a bit.

The bad news? This phase can last for 4 to 6 months, and your shoulder’s lack of mobility might affect your day-to-day activities.


The Thawing Stage

The thawing stage is the phase when things start to heat up, in a positive way. Your shoulder starts to “thaw,” allowing for an improved range of motion.

Patience is key during this stage, as it might take anywhere from 6 months to 2 years for your shoulder to get back to normal.


What are the Causes of Frozen Shoulder?

frozen shoulder

The causes of frozen shoulders are unclear even to the most seasoned experts. In fact, sometimes it can just show up out of the blue, which can be a bit of a bummer. However, certain factors can predispose you to this condition:


Sustaining Injury or Undergoing Surgery

If you’ve had to keep your shoulder from moving for a while (say, in a sling), it might decide to freeze up on you. That’s because when your shoulder isn’t getting moved around, the connective tissue can thicken and tighten up, leaving you with a frozen shoulder.


Dealing With Certain Conditions

Conditions like diabetes or thyroid-related issues predispose you to a frozen shoulder. The reason for this is not exactly clear, but it does seem that these conditions are linked to frozen shoulders more often.


Age and Gender

Frozen shoulder typically affects patients between 40 and 60 years old, and it’s more common in women than men.


Frozen Shoulder Can Recur in the Opposite Shoulder

There’s a higher chance you’ll experience a frozen shoulder if you’ve had it before, especially on the opposite side.


What are the Common Symptoms of the Frozen Shoulder Syndrome?

If you’re suspecting you might have a frozen shoulder, here are some telltale signs that can give you a clue:

  • Pain: It’s not just a mild soreness, but a steady ache that can keep you up at night. It usually sticks around in the shoulder area, spreading to the outer shoulder and even the upper arm.
  • Limited range of motion: Suddenly, reaching for the top shelf or doing a quick shoulder roll isn’t as easy as it used to be. It might even feel like an invisible force is holding your shoulder back when you try to move it.
  • Stiffness: Your shoulder might feel as though it’s caught in a vise, becoming rigid and refusing to cooperate.
  • Difficulty with daily activities: Dressing, showering, or even brushing your hair can become a major task.


How is Frozen Shoulder Syndrome Diagnosed?

Diagnosing a frozen shoulder is a process of elimination and observation.

Your physician will first ask about your symptoms and take a closer look at your medical history. They will ask questions about when you first noticed the pain, how severe it is, and what movements make it worse, to get a better sense of your condition.

Next, your physician will ask you to perform some arm and shoulder movements, such as raising your arm, rotating your shoulder, or reaching across your body. This basic physical exam will help ascertain the degree of your restricted movement.

The tricky thing about diagnosing frozen shoulder is that its symptoms can look a lot like other shoulder issues. Therefore, your physician might request imaging tests like an X-ray, an MRI, or an ultrasound. These tests aren’t designed to spot the frozen shoulder itself, but to ensure there’s nothing else going on, like arthritis or a torn rotator cuff.


How Does Chiropractic Care Address Frozen Shoulder?

chiropractic care address frozen shoulder

Chiropractic adjustments are an excellent, non-invasive way to address your frozen shoulder symptoms!

By focusing on improving joint mobility and breaking down scar tissue, our chiropractic techniques can help get your shoulder back to its normal, pain-free self!


Chiropractic Shoulder Manipulation

Picture your chiropractor gently moving your shoulder to its limits — that’s what chiropractic manipulation is all about! This process helps to stretch or break down the adhesions (sticky bits of scar tissue) causing your shoulder stiffness and pain.

The goal of a chiropractic manipulation is to get your shoulder joint moving freely again with immediate pain relief. But, it’s not a one-time fix. You might need a few sessions to get the full benefit, so patience is key.


Active Release Technique (ART)

Active Release Technique, or ART, is akin to a laser-focused massage. Your chiropractor uses their hands to apply pressure to specific muscles, tendons, and ligaments in your shoulder while you move your arm.

The combination of applied pressure and specific movements will improve your range of motion, break down scar tissue, and reduce pain.

Just like with shoulder manipulation, it can take a few sessions to see the best results.


What are the Chiropractic Treatment Benefits for Frozen Shoulder?

Let’s talk about why having a chiropractor handle your frozen shoulder is an absolute game-changer.


Immediate Shoulder Pain Relief

Patients with shoulder joint pain will quickly see their discomfort levels decrease after their first chiropractic treatment.


No More Limited Range of Movement

If you’ve got a frozen shoulder, you know all about limited movement.

Chiropractic care will help you reclaim your shoulder’s range of motion. Whether you want to swing a golf club, reach for a high shelf, or just give someone a good old-fashioned high five, chiropractic treatment can get you back to your everyday activities without that annoying stiffness holding you back!


Providing a Personalized Treatment Approach

Instead of going for a one-size-fits-all approach, your chiropractor will customize the treatment to fit your specific needs. No two shoulders are the same, so why should treatment be any different? They’ll work with you to develop a plan that suits your body, your lifestyle, and your pain levels.


The Chiropractic Mindset Focuses on Proactivity

With regular chiropractic care, you can help prevent future instances of frozen shoulders. By keeping your shoulder joint healthy and mobile, you’re less likely to face this issue down the line!


What are the Other Treatment Options for Frozen Shoulder?

treatment options for frozen shoulder

While chiropractic care is an effective way to deal with a frozen shoulder, it’s not the only option on the menu. Let’s dive into some of the other ways you can tackle this problem:

  • Physical therapy: PT is like your shoulder’s personal trainer. Our list of 10 exercises will help increase flexibility and range of motion while strengthening the muscles around the joint. It’s all about getting that shoulder moving again!
  • Medications: Over-the-counter pain medication like ibuprofen can help reduce inflammation and discomfort.
  • Steroid injections: They are the big guns when it comes to knocking out inflammation and pain. Steroids are injected directly into the shoulder joint to provide some much-needed relief.
  • Joint distension: During this procedure, sterile water is injected into the shoulder joint to stretch the tissue and improve range of motion.
  • Surgery: Surgical treatment is recommended only when all other treatments have failed. Your surgeon will remove the scar tissue and adhesions from inside the shoulder joint.

Everyone’s different, so the best approach for you might be different than for someone else. Be sure to chat with your healthcare provider about the best option for your circumstances. Here’s to getting that shoulder thawed out and moving again!


Unleash Your Mobility With Chiropractic Care for Your Frozen Shoulder!

At Bergen Chiropractic and Sports Rehabilitation Center, our chiropractic team, under the leadership of Dr. Gregory Doerr, adheres to the highest and most professional medical standards to provide superior chiropractic help. Our mission is to provide unparalleled patient care in a comfortable, healing atmosphere. 

Access our contact form or call us at (201) 945-4075 to learn more about our chiropractic treatment services! Our chiropractic offices at 532 Anderson Avenue, Cliffside Park, NJ 07010, and 62 Summit Ave, Hackensack, NJ 07601, are ready to welcome you as we proudly serve New York, New Jersey, Philadelphia, PA, and Baltimore, MD, areas. Also, feel free to access our blog, Facebook, and Instagram pages for more information on chiropractic treatments!


References

  1. Austin, Dr. Amanda B. “An Overview of Frozen Shoulder Relief Using Chiropractic Care .” Tri State Clinic North Chiropractic of Chattanooga, tristateclinic.com/2020/11/18/an-overview-of-frozen-shoulder-relief-using-chiropractic-care/. Accessed 5 Jul. 2023.
  2. “Fight Frozen Shoulder Syndrome with Chiropractic Treatment 2022.” El Paso West Texas Chiropractic Center # 1in Chiropractic Care, 22 Dec. 2021, www.westtexaschiropractic.com/fight-frozen-shoulder-syndrome/. Accessed 5 Jul. 2023.
  3. “Frozen Shoulder.” Mayo Clinic, Mayo Foundation for Medical Education and Research, 19 Aug. 2022, www.mayoclinic.org/diseases-conditions/frozen-shoulder/symptoms-causes/syc-20372684. Accessed 5 Jul. 2023.
  4. “Why You Should Consider Chiropractic If You Suffer From Frozen Shoulder.” Gonstead Chiropractic Fort Mill SC, 7 Mar. 2018, gonsteadchiropracticcenter.com/why-you-should-consider-chiropractic-if-you-suffer-from-frozen-shoulder/. Accessed 5 Jul. 2023.
15 Easy Stretches to Address Your Text Neck Pain!

15 Easy Stretches to Address Your Text Neck Pain!

Today’s article is a comprehensive guide of the ways to address your text neck pain.

Study after study has proved that experiencing neck pain is a prevalent condition among the general population, targeting:

  • University students
  • People working from home

Fortunately, your text neck discomfort will vanish as soon as you address its causes and symptoms through physical therapy, lifestyle improvements, and light exercise.

Let’s learn more about how your text neck ties in with other medical conditions and how a chiropractic approach will help your neck and shoulder muscles feel like new!

“Take a few minutes every day to stretch your text neck pain away!”


What is a Text Neck?

text neck

Text neck — or “tech neck” — is a modern-day condition caused by spending too much time hunched over our phones and other electronic devices.

When we tilt our heads down toward our screens, we put extra stress on our neck and spine.

Imagine your head as a bowling ball. Normally, it’s balanced nicely on top of your spine. But when you tilt your head forward to look at your phone, it’s like you’re holding that bowling ball out in front of you. This puts a whole lot of pressure on the muscles in your neck that are trying to hold it up — way more than they’re designed to handle.

Because of this extra strain, we start to feel symptoms like neck pain, soreness, and stiffness. This condition can even lead to headaches and shoulder pain.

Even worse text neck causes a real change in the natural curve of our necks, leading to:

  • Disc herniation
  • Pinched nerves
  • Early onset of neck arthritis


Why Do I Have a Text Neck?

You are likely dealing with text neck if you’re:


Spending Too Much Time With Your Head Tilted Forward

It’s not just texting; it could be browsing, reading, or playing games. When you’re in this position, the weight of your head puts extra stress on your neck, leading to pain or discomfort.


Not Taking Enough Breaks

If you’re glued to your computer screen for hours without looking up or changing position, you’re not giving your neck a chance to rest.


Having Poor Posture Overall

text neck cause

When you work long hours on a laptop or desktop and don’t maintain good posture, bad ergonomics can lead to a whole bunch of problems, including text neck.


What Medical Issues Can a Text Neck Cause?

Text neck can lead to various medical issues over time, including:

  • Chronic neck and shoulder pain: Regular pain in your neck and shoulders is the most common symptom of text neck.
  • Headaches: A strained neck can cause tension headaches.
  • Reduced neck mobility: Your neck isn’t as flexible as it used to be, or it hurts when you try to turn your head.
  • Early onset of neck arthritis: Over time, text neck can cause wear and tear on the structures of your neck, leading to the early onset of arthritis.
  • Disc herniation: This condition occurs when one of the discs in your spine gets compressed so much that it bulges or ruptures.
  • Pinched nerve: If a disc in your spine bulges enough from the pressure, it can start to press on one of your nerves, causing symptoms ranging from pain and numbness to weakness in your arms or hands.


Shall I See My Chiropractor for Text Neck Treatment?

Absolutely! If you’ve got a case of text neck, it’s a great idea to see a chiropractor.

Chiropractors are all about making sure your spine is properly aligned, and they have a bunch of techniques up their sleeves to help alleviate pain and improve function in your neck and spine!

When it comes to text neck, your chiropractor will assess your posture, the severity of your symptoms, and your neck’s range of motion. Then, they can provide you with treatment that may involve spinal adjustments to correct any misalignments. Plus, they can guide you on exercises and stretches that will help strengthen your neck muscles and improve your posture.

A chiropractor will also give you advice on how to prevent text neck in the future, such as:

  • Ergonomic tips for your workstation
  • Proper phone handling
  • Reminders to take regular breaks from screen time


15 Exercises and Stretches to Reduce Text Neck Pain

Behind-the-Back Drill

text neck treatment

This stretch is a total champ at opening up the chest and shoulders!

  1. Stand up straight with your feet hip-width apart. Keep your knees a little soft, so you’re not locking them.
  2. Interlace your fingers behind your back. You can hold onto a towel or a strap between your hands to make it easier.
  3. Gently straighten your arms and lift them up away from your back. Only go as far as feels comfortable.
  4. As you lift your arms, be careful not to let your ribs pop forward. Keep them down and your core slightly engaged.
  5. Hold this position for about 20 to 30 seconds. Remember to keep breathing!
  6. To release the stretch, slowly lower your arms back down and unclasp your hands.


Bow Pose

bow pose

The Bow Pose is a backbend that really opens up the chest, tones the abdominal muscles, and gives a nice stretch to your whole body.

  1. Lie down flat on your stomach. Bend your knees and bring your feet towards your butt.
  2. Reach back with your hands and grab hold of your ankles. If you can’t quite reach them, no worries! Just go as far as you can.
  3. As you inhale, lift your chest off the floor and pull your legs up and back.
  4. Look straight ahead and try to keep your neck relaxed. You’re aiming to get your body to look like a bow, with your arms as the string.
  5. Hold the pose for 15-20 seconds, or however long feels good for you. Remember to breathe!
  6. Exhale and slowly lower your chest and legs back to the floor. Let go of your ankles and relax.


Cat-Cow

cat cow

The Cat-Cow stretch is super for your back and neck, and guess what? It’s super easy, too!

  1. Start by getting on all fours on a comfortable surface. Make sure your hands are under your shoulders and your knees are under your hips.
  2. Slowly drop your belly towards the mat, lift your chin and chest, and gaze up toward the ceiling. Take a nice deep breath in as you do this.
  3. As you exhale, draw your belly to your spine and round your back toward the ceiling. The head comes down to look towards your navel, but don’t force it, just let it drop comfortably.
  4. And there you have it, that’s one rep!


Chin Tuck

neck pain

This simple exercise can be done anywhere — at your desk, while watching TV, or even when waiting for your coffee to brew!

  1. Get yourself in a comfortable position. You can either be standing up or sitting down.
  2. Look straight ahead while keeping your spine straight. Pretend there’s an invisible string pulling the crown of your head towards the ceiling.
  3. Without tilting your head in any direction or rounding your shoulders, slowly draw your chin back towards your throat.
  4. You should feel a gentle stretch along the back of your neck and maybe even down into your shoulders.
  5. Hold that position for about 5 seconds, then relax. Aim for about 10 reps in total.


Downward-Facing Dog

stretches

This stretch is awesome for your back, shoulders, hamstrings, calves — pretty much everything!

  1. Start on your hands and knees, with your wrists under your shoulders, and your knees under your hips. Tuck your toes under.
  2. Take a deep breath, and as you exhale, lift your knees off the floor. You’re gonna push your butt up towards the ceiling.
  3. Push the floor away with your hands and feet.
  4. Keep those arms straight, but don’t lock your elbows. Your ears should be in line with your arms, so you’re not straining your neck.
  5. Try to bring your heels down towards the ground.
  6. Take deep breaths and chill here for a few seconds.
  7. To come out of it, slowly lower your knees back to the floor.


Exaggerated Nod

neck pain1

This easy stretch can help relieve tension in your neck, especially if you’ve been stuck in that text neck position.

  1. Stand or sit up straight, with your shoulders relaxed.
  2. Slowly lower your chin down towards your chest, as if you’re nodding in slow motion. You should feel a gentle stretch along the back of your neck.
  3. Hold this position for about 5 seconds.
  4. Slowly lift your chin up towards the ceiling, extending your neck backward.
  5. Hold this position for another 5 seconds.
  6. Return to the starting position. Aim for about 10 reps in total.


Padahastasana

standing forward bend

Also known as the Standing Forward Bend, this yoga pose is fantastic for giving your back, legs, and even your mind a healthy stretch.

  1. Stand straight, with your feet hip-width apart. Let your arms hang loose at your sides.
  2. Take a deep breath in, and as you exhale, bend forward from your hips. You’re aiming to bring your head towards your knees.
  3. Try to place your hands beside your feet on the floor. If you can’t reach the floor, no worries! Just go as far as you can.
  4. Hold the position for a few seconds or even a minute if you can. Remember to breathe.
  5. Bend your knees slightly, and then slowly roll your spine up until you’re standing straight again.


Quadruped Thoracic Rotation Stretch

This is an amazing stretch for increasing mobility in your upper back and improving your posture.

  1. Get on all fours on a mat. Your hands should be right under your shoulders, with your knees under your hips.
  2. Place your right hand behind your head to keep it aligned.
  3. Rotate your right elbow and shoulder towards your left elbow. Only your upper back should be rotating.
  4. Go as far as your flexibility allows, then pause for a moment.
  5. From there, rotate your right elbow up towards the ceiling, following the movement with your eyes.
  6. Hold for a moment at the top, really feeling the stretch through your back and spine.
  7. Bring your right hand back behind your head. Repeat 5-10 times before switching to your left side.


Reverse Shoulder Stretch

This one’s a winner if you’re looking to loosen up those tight shoulders, especially after a long day of typing away or doing any work that has your arms out in front of you.

  1. Stand up straight with your feet hip-width apart. Keep your knees slightly bent.
  2. Extend your arms out behind you and clasp your hands together. If you can’t quite reach, that’s alright! You can use a towel or a strap to help bridge the gap.
  3. Slowly lift your hands upwards. You’re aiming to feel a good stretch across your chest muscles and shoulders.
  4. Keep your back straight and your gaze forward at all times.
  5. Hold the stretch for about 20 to 30 seconds.
  6. Gently lower your arms, unclasp your hands and give them a little shake.


Seated Heart Opener

This stretch is fantastic for opening up your chest, stretching your shoulders, and counteracting forward slouching.

  1. Find yourself a comfy seat. It could be a chair, the edge of your bed, or even a yoga block if you’ve got one.
  2. Sit close to the edge of your seat with your feet firmly planted on the ground. This will help you maintain balance during the stretch.
  3. Reach your hands behind you and place them on the edge of your seat. Your fingers should be pointing away from your body.
  4. Lift your chest towards the ceiling, letting your head drop back gently if it feels okay for your neck.
  5. You should feel a wonderful stretch across your chest and front shoulders. Remember to keep breathing and enjoy the stretch.
  6. Hold this pose for 30 seconds.
  7. Slowly lift your head back up and release your hands.


Seated Neck Release

The Seated Neck Release is a simple yet effective stretch for relieving tension in your neck and shoulders. You can do it pretty much anywhere you can sit down, so it’s perfect for a quick break during your workday.

  1. Start off by finding a comfy seat. You could use a chair, a bench, or even the floor. Make sure your back is straight.
  2. Sit up nice and tall while relaxing your shoulders.
  3. Gently tilt your head to the right, aiming to bring your ear towards your shoulder. You should feel a nice stretch down the left side of your neck and into your shoulder.
  4. Hold this position for about 30 seconds, then slowly lift your head back up.
  5. Repeat the same steps while tilting your head to the left.
  6. You can do this stretch as often as you need to throughout the day. It’s a great way to break up long periods of sitting or standing.


Thoracic Extension

The Thoracic Extension stretch is an effective way to loosen up the thoracic spine and combat a slouchy posture.

  1. Start by sitting on the edge of a chair, with your feet flat on the ground. Make sure your knees are bent at a comfortable, 90-degree angle.
  2. Interlace your fingers and put your hands behind your head.
  3. Lean back over the edge of the chair while keeping your lower back and hips steady.
  4. As you lean back, take a nice, deep breath. You should feel a stretch in your chest and a nice extension in your upper back.
  5. Hold the stretch for a few seconds. Remember to keep breathing!
  6. Exhale and return to the starting position. Aim for about 10 reps in total.


Thread the Needle

This yoga practice staple a fantastic pose to release tension and increase flexibility in your shoulders, upper back, and neck.

  1. Start by getting on all fours — hands under your shoulders and knees under your hips.
  2. Take your right hand and slide it, palm facing up, under your left arm.
  3. Keep sliding that right hand over to the left until your right shoulder and the right side of your face gently rest on the floor. Your gaze should naturally be towards the left.
  4. Your left hand can stay where it is, or for a deeper stretch, you can extend it out in front of you on the floor.
  5. Hold this position a few deep breaths. Enjoy the twist and the stretch across your shoulder and upper back.
  6. To come out of the stretch, push gently into your left hand, slide your right hand back to its starting position, and return to all fours.
  7. Repeat the same steps, but this time thread your left hand under your right arm.
  8. You can do this stretch a few times on each side, or as often as needed throughout the day.


Trap Stretching

This stretch is perfect for relieving tension in your upper back and shoulders, specifically targeting your trapezius muscles.

  1. Start by standing or sitting up tall, ensuring your back is straight.
  2. Take your right arm, reach it over your head and place your hand on your left ear.
  3. Gently pull your head to the right, tilting it towards your right shoulder.
  4. Hold that position for about 15-30 seconds. You should feel a nice stretch on the left of your neck and into your shoulder.
  5. Release slowly, bring your head back to center, and switch sides to balance it out.
  6. Do this stretch a couple of times on each side, or until you feel your tension melting away.


T-Spine Windmill Stretch

This stretch is all about increasing mobility in your thoracic spine. Plus, it feels amazing!

  1. Start off in a tabletop position — hands under shoulders and knees under hips.
  2. Take your right hand and place it behind your head. Your elbow should be bent and pointing out to the side.
  3. Rotate your right elbow towards your left elbow under your body. Follow the movement with your eyes.
  4. Once you’ve rotated as far as you can go, reverse the movement and rotate your right elbow up towards the ceiling. Let your gaze follow the movement.
  5. Try to keep the rest of your body still during the stretch. The movement should come from your thoracic spine, not your hips or lower back.
  6. Repeat this windmill-like motion 10 times, then switch sides.


5 Effective Ways to Prevent Text Neck Pain

5 effective ways to prevent text neck pain (1)

Aside from stretching, you can adopt a proactive approach to tech neck pain. Our 5 effective tips will help relieve all that pent-up stress in your neck and shoulder muscles, minimizing your text neck risk.


Hold Your Phone the Right Way

Try holding your phone at eye level as much as possible. It’ll prevent you from bending your neck and straining those tight muscles. Maybe you’ll get a bonus arm workout, too!


Take Some Time Away From Your Phone

Even if you’re mid-scroll through the funniest Twitter thread, make sure to take frequent breaks.

Lift your head up, roll your shoulders, do a quick stretch, or simply look out the window for a bit. It’ll help reset your posture and give your eyes a break too.


Invest in a High-Quality Standing Desk

If you’re spending hours a day working at a desk, it might be time to consider getting a standing desk. It helps promote better posture and reduces the risk of neck, shoulder, and back pain. 

Plus, switching between sitting and standing throughout the day can keep you feeling more alert and engaged.


Keep an Eye on Your Posture

Try to keep your back straight and shoulders back when you’re standing or sitting. Imagine a string pulling you up from the top of your head. And don’t forget about your lower body — keep your feet flat on the floor when you’re sitting, and try to avoid crossing your legs.


Does Your Chair Support Proper Posture?

If a standing desk isn’t your thing, a high-quality ergonomic chair can make a world of difference. These chairs are designed to support your body properly and can be adjusted to fit you just right. It’s an investment, but your body will thank you!


Looking for a Text Neck Chiropractor? Dr. Doerr Can Help!

At Bergen Chiropractic and Sports Rehabilitation Center, our chiropractic team, under the leadership of Dr. Gregory Doerr, adheres to the highest and most professional medical standards to provide superior chiropractic help. Our mission is to provide unparalleled patient care in a comfortable, healing atmosphere. 

Access our contact form or call us at (201) 945-4075 to learn more about our chiropractic treatment services! Our chiropractic offices at 532 Anderson Avenue, Cliffside Park, NJ 07010, and 62 Summit Ave, Hackensack, NJ 07601, are ready to welcome you as we proudly serve New York, New Jersey, Philadelphia, PA, and Baltimore, MD, areas. Also, feel free to access our blog, Facebook, and Instagram pages for more information on chiropractic treatments!


References

  1. Lambrou, Dr. Dimitrios. “11 Tips for Getting Rid of Tech Neck.” Northeast Spine and Sports Medicine, 23 Sept. 2022, www.northeastspineandsports.com/blog/11-tips-for-getting-rid-of-tech-neck-northeast-spine-and-sports-medicine/. Accessed 3 Jul. 2023.
  2. Kassel, Gabrielle. “Fix Text Neck with These 6 Exercises and Lifestyle Tips.” Healthline, Healthline Media, 30 May 2020, www.healthline.com/health/fitness-exercise/text-neck-treatment#prevention-tips. Accessed 3 Jul. 2023.
  3. “Say Goodbye to Tech Neck: 5 Essential Physical Therapy Exercises to Help You Get Rid of Pain.” Kessler Rehabilitation Center, www.kesslerrehabilitationcenter.com/why-choose-us/news-blog/physical-therapy-exercises-for-tech-neck-treatment/. Accessed 3 Jul. 2023.
  4. Haupt, Angela, et al. “‘Tech Neck’: Why It’s so Bad for Your Health and How to Beat It.” EverydayHealth.Com, www.everydayhealth.com/wellness/how-to-beat-tech-neck-and-why-its-so-bad-for-your-health/. Accessed 3 Jul. 2023.
  5. David, DeWitt. “Text Neck Treatment and Prevention.” Spine, www.spine-health.com/conditions/neck-pain/text-neck-treatment-and-prevention. Accessed 3 Jul. 2023.
  6. “Text Neck: Health Problems, Finding Relief, and More.” WebMD, WebMD, www.webmd.com/pain-management/what-to-know-text-neck. Accessed 3 Jul. 2023.